 I started by dying the old seat black. With several coats of leather dye and leather protector the old backrest came up quite nicely.
I drove down to AFT timbers in Port Melbourne and bought 4m of Victorian Ash.
I then used my solidworks file to get the vic ash routed into what would be my legs and armrest.
I used Domino joints to connect legs the pieces of timber.
I glued and clamped the legs and then sanded and routed around the edges.
I decided rather than making my own new back rest brace I would use the old legs to do the job instead. Already being shaped to the backrest saved me a lot of time. I cut the legs to size and sanded the stain back so it would match the vic ash on the rest of the chair.
I glued and screwed the old legs onto the frame and slipped the backrest on.
I built a seat from plywood. and spray painted it black to match the backrest.
I also filled all the holes and gaps in the timber and put my first coat of varnish on. I used a spray on clear coat to give a clear but reasonably glossy finish.
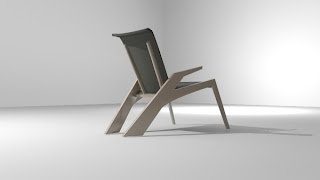
With a few more coats of varnish and a further clean up of the back rest this is the final product.
A $20 dining chair redesigned to become a comfortable new armchair.


